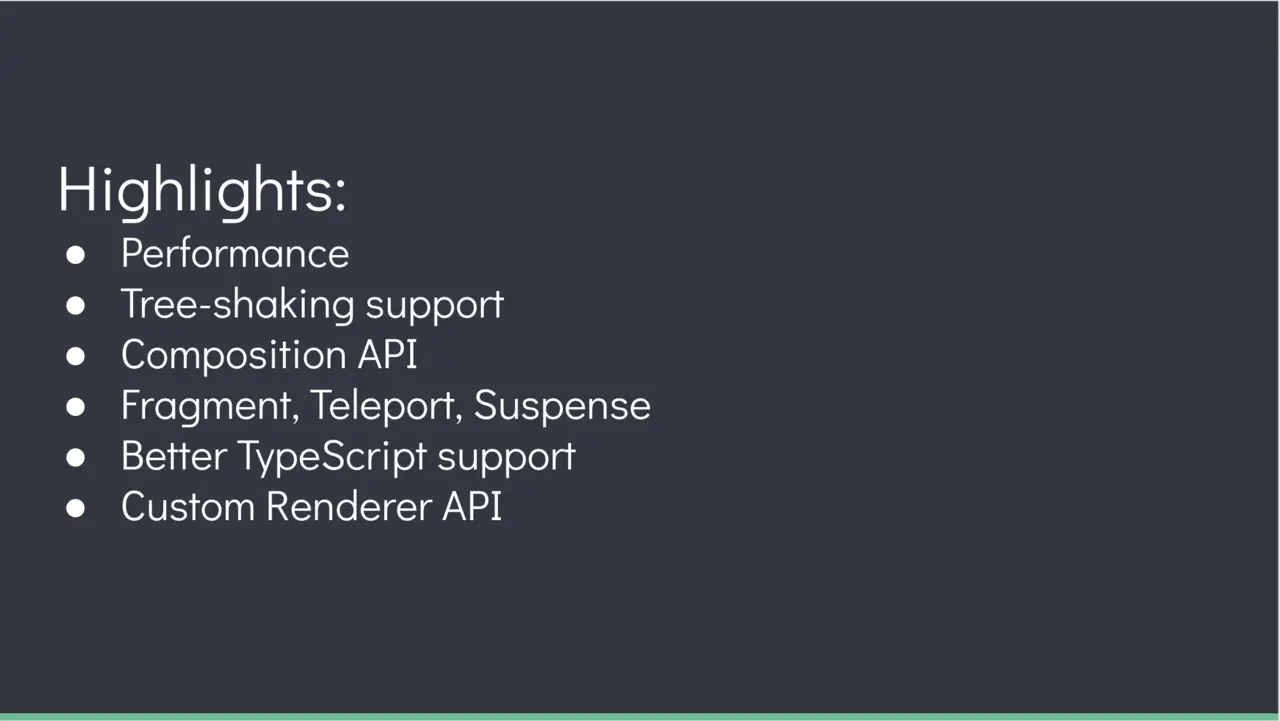
# vue3概览
为了躲懒,直接上图。
# 安装
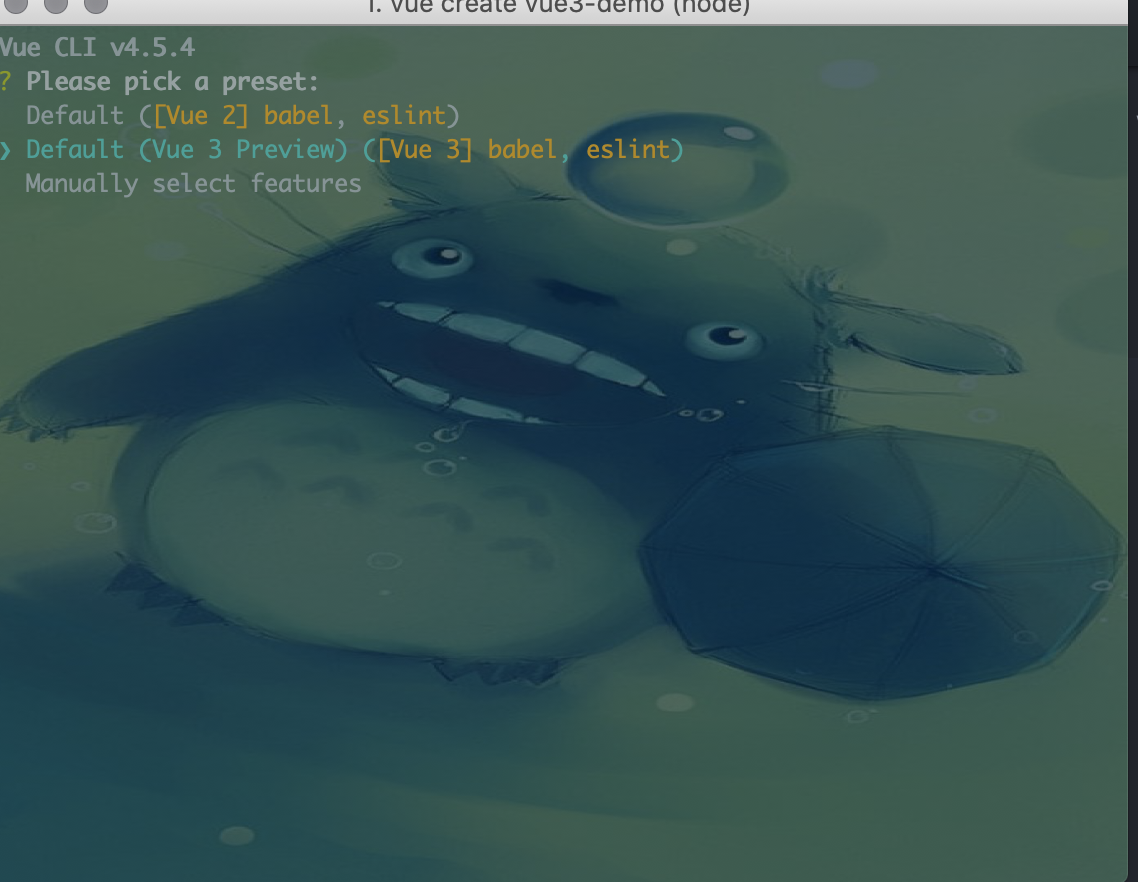
为了体验 vue3.0 新特性,您的脚手架版本应该使用 Vue CLI v4.5,然后重新全局安装最新@vue/cli:
yarn global add @vue/cli@next
# OR
npm install -g @vue/cli@next
2
3
创建项目:
vue create vue3-demo
选择如图 Vue3.0 脚手架就安装 OK 了:
# Composition API
Why Composition API ? 官方是这么解释的。
创建 Vue 组件允许我们将接口的可重复部分及其功能提取到可重用的代码片段中。就可维护性和灵活性而言,仅这一点就可以让我们的应用程序走得很远。然而,我们的共同经验已经证明,仅凭这一点可能还不够,尤其是当应用程序变得非常庞大时——考虑到数百个组件。在处理如此大型的应用程序时,共享和重用代码变得尤为重要。
# setup
Composition API 的入口就是 setup 函数,携带两个参数。
- props
- context
# props
setup 的 props 和 vue2 中 props 的概念是一样的。 props 是响应式的,如果用 es6 解构,响应式就失效了,这时候就需要用 toRefs 包一下。还有就是所有模板中需要的数据都需要在 return 中返回。
<!-- HelloWorld.vue -->

<template>
  <div>{{ customMsg }}</div>
</template>

<script>
import { toRefs } from 'vue'

export default {
  props: {
    msg: String
  },
  setup(props) {
    // 解构需要用toRefs包一下
    const { msg: customMsg } = toRefs(props)
    // setup中取值需要xxx.value,template可以直接访问
    console.log('customMsg', customMsg.value)
    // 所有模板中用到的数据都需要返回
    return {
      customMsg
    }
  }
}
</script>
2
3
4
5
6
7
8
9
10
11
12
13
14
15
16
17
18
19
20
21
22
23
24
25
# context
这是 setup 的第二个参数,context 是一个暴露了三个参数的对象,且不是响应式的,所以可以安全的使用解构。
<template> </template>

<script>
export default {
  props: {
    msg: String
  },
  setup(props, { attrs, slots, emit }) {
    // Attributes (Non-reactive object)
    console.log(attrs)

    // Slots (Non-reactive object)
    console.log(slots)

    // Emit Events (Method)
    console.log(emit)
  }
}
</script>
2
3
4
5
6
7
8
9
10
11
12
13
14
15
16
17
18
19
# Reactvity(ref, reactive, computed, watch, watchEffect)
# ref, reactive
在 vue2.x 版本中,都是用 data 来定义响应式数据,compistion api 中使用 ref 和 reactive 来定义响应式数据。 它们的区别是一个是定义基本类型数据,一个定义引用类型,还有就是ref包裹setup中需要xxx.value取值,reactive则不需要。
<template>
  <p>书本数量:{{ bookNum }}</p>
  <p>书本名:{{ book.title }}</p>
  <p>出版社:{{ book.press }}</p>
</template>

<script>
import { ref, reactive } from 'vue'

export default {
  setup() {
    const bookNum = ref(0)
    const book = reactive({
      title: 'vue入门教程',
      press: '人民出版社'
    })

    return {
      bookNum,
      book
    }
  }
}
</script>
2
3
4
5
6
7
8
9
10
11
12
13
14
15
16
17
18
19
20
21
22
23
24
# computed
计算属性,写法变了一下。
<template>{{plusOne}}</template>

<script>
import { ref, computed } from "vue";

export default {
  setup() {
    const count = ref(0);
    const plusOne = computed(() => count.value + 1);

    return {
      plusOne
    };
  }
};
</script>
2
3
4
5
6
7
8
9
10
11
12
13
14
15
16
# watchEffect
如果我们想要在某个响应式状态更新时做些事情,就用这个方法,类似<React.useEffect></React.useEffect>。
<template></template>

<script>
import { ref, watchEffect } from "vue";

export default {
  setup() {
    const count = ref(0);

    watchEffect(() => {
      console.log("watchEffect", count.value);
    });

    setTimeout(() => {
      count.value++;
    }, 1000);
  }
};
</script>
2
3
4
5
6
7
8
9
10
11
12
13
14
15
16
17
18
19
20
# watch
和option watch 功能一样,点击按钮就会触发wacth。 watch的数据格式:可以是有返回值的getter函数,也可以直接是ref。
<template>
  count:{{count}}/age:{{state.age}}
  <button @click="handleClick">click</button>
  <button @click="handleClick2">click2</button>
</template>

<script>
import { ref, reactive, watch } from "vue";

export default {
  setup() {
    const count = ref(0);
    const state = reactive({ age: 18 });

    const handleClick = () => {
      count.value++;
    };

    const handleClick2 = () => {
      state.age++;
    };

    // watching a ref
    watch(count, (count, prevCount) => {
      console.log("1", count, prevCount);
    });

    // watching 有返回值的getter函数
    watch(
      () => state.age,
      (age, prevAge) => {
        console.log("2", age, prevAge);
      }
    );

    return {
      count,
      state,
      handleClick,
      handleClick2
    };
  }
};
</script>
2
3
4
5
6
7
8
9
10
11
12
13
14
15
16
17
18
19
20
21
22
23
24
25
26
27
28
29
30
31
32
33
34
35
36
37
38
39
40
41
42
43
44
# lifeCycle
以下是生命周期的对比,下面所有钩子都必须写在setup中。
| Options API | Hook inside inside setup |
|---|---|
| beforeCreate | Not needed* |
| setup | |
| created | Not needed* |
| beforeMount | onBeforeMount |
| mounted | onMounted |
| beforeUpdate | onBeforeUpdate |
| updated | onUpdated |
| beforeUnmount | onBeforeUnmount |
| unmounted | onUnmounted |
| errorCaptured | onErrorCaptured |
| renderTracked | onRenderTracked |
| renderTriggered | onRenderTriggered |
下面是几个常见的几个生命周期的例子:
<template>
  <p>书本数量:{{ bookNum }}</p>
  <p>书本名:{{ book.title }}</p>
  <p>出版社:{{ book.press }}</p>
</template>

<script>
import {
  ref,
  reactive,
  onBeforeMount,
  onMounted,
  onUpdated,
  onBeforeUnmount,
  onUnmounted
} from "vue";

export default {
  const bookNum = ref(0);
    const book = reactive({
      title: "vue入门教程",
      press: "人民出版社"
    });

    const handleClick = () => {
      bookNum.value++;
    };

    onBeforeMount(() => {
      console.log("onBeforeMount");
    });

    onMounted(() => {
      console.log("onMounted");
    });

    onUpdated(() => {
      console.log("onUpdated");
    });

    onBeforeUnmount(() => {
      console.log("onBeforeUnmount");
    });

    onUnmounted(() => {
      console.log("onUnmounted");
    });

    return {
      bookNum,
      book,
      handleClick
    };
}
</script>
2
3
4
5
6
7
8
9
10
11
12
13
14
15
16
17
18
19
20
21
22
23
24
25
26
27
28
29
30
31
32
33
34
35
36
37
38
39
40
41
42
43
44
45
46
47
48
49
50
51
52
53
54
55
# provide/inject
这个是我们通常用来祖先组件向子孙组件传递数据的,写法也改了。
<!-- MyMap.vue -->
<template>
  <my-marker></my-marker>
</template>

<script>
import { provide } from "vue";
import MyMarker from "./MyMarker.vue";

export default {
  components: {
    MyMarker
  },

  setup() {
    provide("location", "North Pole");
    provide("geolocation", {
      longitude: 90,
      latitude: 135
    });
    return {};
  }
};
</script>
2
3
4
5
6
7
8
9
10
11
12
13
14
15
16
17
18
19
20
21
22
23
24
25
<!-- MyMarker.vue -->
<template>
  <div>
    {{location}}
    {{geolocation}}
  </div>
</template>

<script>
import { inject } from "vue";

export default {
  setup() {
    const location = inject("location");
    const geolocation = inject("geolocation");

    return {
      location,
      geolocation
    };
  }
};
</script>
2
3
4
5
6
7
8
9
10
11
12
13
14
15
16
17
18
19
20
21
22
23
# Template Refs
其实就是Vue里面获取组件或者或者DOM节点的api,看例子。 原来是this.$refs[xxx],Composition API this没有了。
<template>
  <div ref="root">hello world</div>
</template>

<script>
import { ref, onMounted } from "vue";

export default {
  setup() {
    const root = ref(null);

    onMounted(() => {
      console.log("ref", root.value);
    });

    return { root };
  }
};
</script>
2
3
4
5
6
7
8
9
10
11
12
13
14
15
16
17
18
19
# Fragment,Teleport,Suspense
# Fragment
在Vue 3,组件现在支持多根节点组件,即fragments,类似于<React.Fragment></React.Fragment>,
下面是3.x和2.x写法对比:
<!-- vue3.x -->
<template>
  <div>a</div>
  <div>b</div>
  <div>c</div>
</template>

<script>
export default {};
</script>
2
3
4
5
6
7
8
9
10
<!-- vue2.x -->
<template>
  <div>
    <div>a</div>
    <div>b</div>
    <div>c</div>
  </div>
</template>

<script>
export default {}
</script>
2
3
4
5
6
7
8
9
10
11
12
# Teleport
平常我们在写组件时,有时候我们创建的组件不需要局限在祖先组件内部,这时候Teleport就能达到这效果。这个也可以从react找到类似的组件<React.Portal></React.Portal>。
下面这个就是直接挂载到body节点了,而不是挂载在当前组件。
<template>
  <button @click="modalOpen = true">open</button>

  <teleport to="body">
    <div v-if="modalOpen" class="modal">
      <div>
        I'm a teleported modal!
        (My parent is "body")
        <button @click="modalOpen = false">Close</button>
      </div>
    </div>
  </teleport>
</template>

<script>
import { ref } from "vue";

export default {
  setup() {
    let modalOpen = ref(false);

    return {
      modalOpen
    };
  }
};
</script>
2
3
4
5
6
7
8
9
10
11
12
13
14
15
16
17
18
19
20
21
22
23
24
25
26
27
# Suspense
这个组件的作用就是可以在异步组件未加载渲染前自定义加载状态的组件,可以简单的认为'正在加载中...'。
下面有两个slot,'#default'是异步组件挂载点,'#fallback'一个是加载状态组件挂载。
如下图:

<!-- SuspenseDemo.vue -->
<template>
  <Suspense>
    <template #default>
      <MyAsyncComponent/>
    </template>
    <template #fallback>
      <div>Loading...</div>
    </template>
  </Suspense>
</template>

<script>
import MyAsyncComponent from "./Async";

export default {
  components: {
    MyAsyncComponent
  }
};
</script>
2
3
4
5
6
7
8
9
10
11
12
13
14
15
16
17
18
19
20
21
22
<!-- MyAsyncComponent.vue -->
<template>
  <h1>Ive some async work to do before I can render</h1>
</template>

<script>
export default {
  name: "MyAsyncComponent",
  async setup() {
    const someAsyncWork = () => {
      // eslint-disable-next-line
      return new Promise((resolve, reject) => {
        setTimeout(() => {
          resolve();
          console.log("hello world");
        }, 3000);
      });
    };
    await someAsyncWork();
  }
};
</script>
2
3
4
5
6
7
8
9
10
11
12
13
14
15
16
17
18
19
20
21
22
23
← Vue中'>>>'的用法 Vue3 全家桶 →